|
–Geoff-Hart.com: Editing, Writing, and Translation —Home —Services —Books —Articles —Resources —Fiction —Contact me —Français |
You are here: Articles --> 2009 --> MadCap Blaze: a new publishing powerhouse?
Vous êtes ici : Essais --> 2009 --> MadCap Blaze: a new publishing powerhouse?
Previously published as: Hart, G. 2009. MadCap Blaze: a new publishing powerhouse? http://www.techwr-l.com/reviews/madcap-blaze-hart (March 2009)
By Geoff Hart
For many years, Microsoft’s Word and Adobe’s Framemaker have been the two main competitors for the hearts and dollars of technical writers. Word offered the benefit of low cost and ubiquity (it ships with most computers these days), and although not optimized for use with large documents, it has generally proven to be up to the challenge, particularly with the overall document split into a collection of smaller documents. (Avoid the "master document" feature; it's badly broken, and using it runs a serious risk of corrupting all the associated documents. Word also offers unparalleled revision tracking tools, which is a boon to workers who must submit their manuscripts to an editor or peer reviewer for revision. Frame, on the other hand, has traditionally offered a superb ability to work with huge documents with nary a glitch, but until recently, lacked the user interface refinements offered by Word, and in particular, lacked truly useful revision tracking tools until Version 8.
In 2008, MadCap software threw their hat into the long-document ring by introducing Blaze. With this announcement, MadCap hoped to do for long-document publishing what they’d already done for Help authoring with Flare: give Adobe and Microsoft a serious run for their money. Combining Frame’s long-document proficiency with Word 2007's underlying XML data structure and high-quality revision tracking tools, Blaze seems to be a perfect solution for producing a variety of online and printed outputs from a single source. (For true single-sourcing, you'd need to be able to produce Help files too. Fortunately, you can open the Blaze files directly in Flare and perform the necessary manipulations in that software.) In this review, I’ll introduce you to Blaze, and give you enough information to help you decide whether Adobe and Microsoft should be losing any sleep—and whether you should consider switching.
To learn the software and put it to the test, I used version 1.3 of Blaze to recreate a newsletter I had formerly created in InDesign CS3. Because I lacked the time to use the software extensively over a long period of time and test it to destruction (as I routinely do with Word and occasionally try with InDesign), I can only comment on the stability and performance during my test period with a smallish document; both were excellent. In addition, I’ve never used Frame, so I can’t give you a point by point comparison with Blaze’s main competitor in the technical writing community.
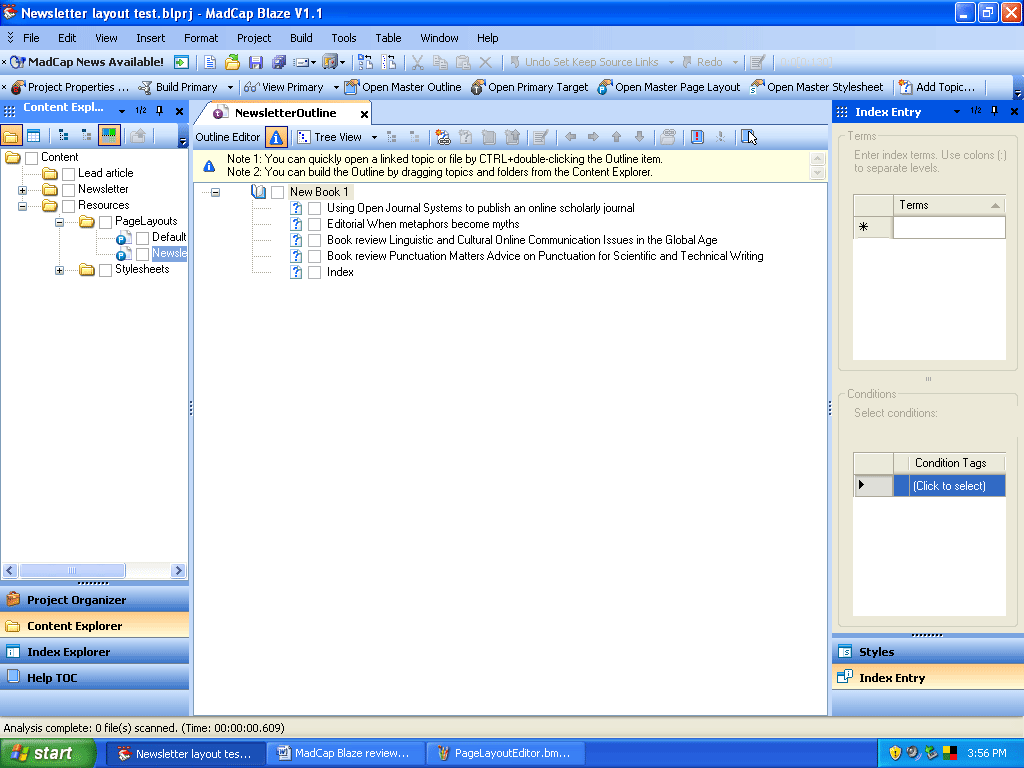
When you launch Blaze, you’ll see something quite different from a typical word processor or desktop publishing program: Blaze presents you with a full workspace rather than a single-document interface. That workspace gathers together all the elements you'll need to complete a project, and comprises the following elements:
If you've done Help authoring with software such as RoboHelp, this kind of interface will seem familiar and functional. If not, the interface will initially seem cluttered and possibly a bit intimidating. The efficiency of this approach will become clearer with practice:
This approach resembles working in Word’s outline view: the outline appears at the left, the document appears in the center, and various tools or palettes can be dragged over to the right side, within easy reach but not covering your workspace. Adobe’s recent Creative Suite products use a similar approach, but with a useful interface addition adopted by Blaze: where multiple tools are displayed simultaneously, they can be stacked together ("docked"). Clicking one of the palettes opens that palette and collapses those above or below it so that you're not overwhelmed with floating windows.
All the windows in this interface can be repositioned and resized, which is fortunate: they take up a large amount of space. As a result, you’ll want a large widescreen display, a dual-monitor setup, or possibly even two large monitors to take full advantage of the workspace. Using a 21-inch square-screen CRT monitor, I found it nearly impossible to display everything I wanted to see simultaneously at a legible size. When I swapped in my 21-inch wide-screen LCD, the situation improved drastically, but still wasn't optimal. If you've got younger eyes than mine and can work with smaller type or smaller windows, this may not be a problem for you.
One nice touch is that once you’ve defined a layout for your workspace, you can save that layout for reuse later. For example, if you want to use one layout for creating information and another for revising and publishing it, you can arrange the many windows and toolbars optimally to support these different groups of functions, and can gain rapid access to each different "dashboard" without having to manually reorganize all the windows each time you switch roles.
If you come from a traditional desktop publishing background, the Blaze concept will take some getting used to. Blaze was designed by programmers who got their start building tools for creating online Help, in which writers focus on discrete chunks of information named “topics”. This approach leads to and was inspired by a highly modular way of thinking about information: although traditional writing also builds larger documents from discrete chunks of information (paragraphs, sentences, words), all of these chunks are designed right from the start to fit together into an integrated whole, all of which fits in a single container—either a file in software such as Word, or a "story" in desktop publishing software such as InDesign. In a topic-based approach to design, the emphasis is on a higher degree of organization: topics comprise all the information required to understand a given concept (such as the interface metaphor) or perform a task (such as a procedure like printing), for instance. If you design a collection of topics with a clear understanding of all the potential uses of the information, such as producing both a printed manual and online Help, the resulting collection of topics lends itself more easily to reuse in those and other contexts. In contrast, the more traditional file- or story-based approach used by most desktop publishing software starts with the final context (e.g., a user manual) and works backwards from that structure to generate the individual files or stories that add up to that structure.
The difference is subtle, because the two approaches are really opposite sides of the same coin. What’s most important about topic-based authoring is that it’s more inherently granular; that is, a project is divided right from the start into granules of varying sizes, ranging from complete topics to tiny granules such as a standard warning message or a product name. These topics are gathered together into one place, such as a shared directory on a network or a private directory for your own project, and from that starting point, can be called upon for reuse in as many other places as necessary. Contrast this with a file- or story-based approach, in which each use of a chunk of information forces you to create a new copy of that information that differs slightly from every other copy.
Consider, for example, the copyright pages for a series of publications: although most of the information will remain the same in each publication (e.g., the company name and mailing address), some parts will differ (e.g., the publication title, ISBN, and copyright date). In a file- or story-based approach, each publication contains its own copyright document, and if the company name or address change, you would have to update that information once per publication. (The same problem arises with editing: each time your editor finds a problem in the copyright page, the writers would have to track down the problem in every publication, make the same correction, and hope that they didn’t miss any publications.) In contrast, a topic-based approach would create a single copyright topic that would be referenced in all publications, but with variables used to define the things that vary between projects (e.g., the title). Such variables can be defined once per publication project and used anywhere that particular information must be inserted. If the copyright page changes, you need only change it only once, in the original topic, and all publications that include that information will be automatically updated to reflect that change. [A look back: This updating will only occur when you recreate (build and publish; see later in this review) the publication. Blaze won't track down and update existing copies that have already been published or copies that have been distributed.] Variables such as the publication name are independent of the copyright topic, and are thus unaffected. Conversely, if you change the publication title by editing that variable, only the title changes, and only in that project; the rest of the copyright page and the copyright pages in other projects are unaffected.
In Blaze, topics are structured into an overall order by creating outlines. Each outline specifies which topics should be included in a given output, and the order in which they appear in that output. If you've done Help authoring, this is roughly analogous to defining a browse sequence, but the difference is that Blaze lets you specify multiple outlines per project, so you could (for instance) use the identical collection of information (a single project) to create both an overall user manual and a training manual that uses some (but not all) of the same information, in a different order.
Unlike most other programs you’ve worked with, Blaze templates are not descriptions of individual documents, but rather comprise broader collections of project settings. Blaze templates would allow you, for instance, to create a separate group of settings for newsletters and user manuals. The newsletter template might contain folders for things you’d never see in a user manual, such as copyright releases, signed documents giving permission to use someone’s photograph, and "boilerplate" such as the masthead (the names of editors, contact information, etc.). The format of individual newsletters and user manuals would be controlled differently, as discussed later in this review.
As in other page-design programs, Blaze lets you define layouts for the individual pages of a project. You do this using the Page Layout Editor, which lets you define the overall format of the pages (e.g., their size and margins), as well as the recurring elements that must be included in each section of the project (e.g., different running headers for the chapters, glossary, and index). Each page format can be named to make it easier to remember its purpose and reuse it elsewhere. You can also define "contextual" page formats that depend on the position of a given page within a larger document. For example, you can define different settings for the first page of a section; if you don’t want to include the chapter title in the header of the chapter's first page because it's already there in 72-point type, you can specify that the running header should be suppressed only on that initial page. You can, of course, define facing left and right pages, and the format for empty pages such as the classic “this page intentionally left blank”. You can also define a “normal” page that will use its own specific settings irrespective of where its contents appear in a layout. That’s useful for defining a specific type of layout such as a two-page spread in the center of a bound book that should not have the standard running headings or page numbers for the section in which it appears.
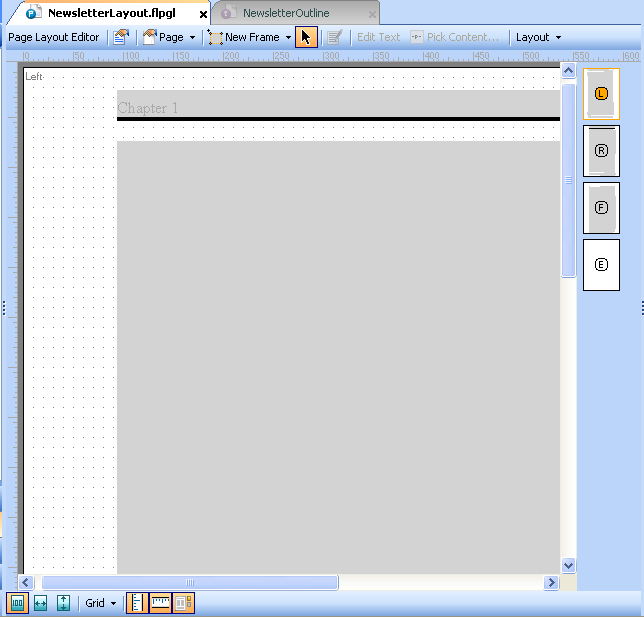
To create a page layout, you launch the Page Layout Editor and start defining your page formats. When you create a new one, Blaze will automatically copy it to the Resources section of your current project, where it becomes available for use with all topics in that project. Each page is defined using a series of standard "frames", which function as placeholders on the page that you define to hold a specific category of content. For example, a typical page would have frames for the running header and running footer, plus a “body” frame that holds the majority of the page's text. A more sophisticated design might include a “sidebar” frame in which parenthetical material such as notes, trivia, and warnings can appear. For occasional blocks of text that won’t fit within any of these standard locations, you can add text boxes, which I'll discuss in more detail later. The Page Layout Editor is WYSIWYG (what you see is what you get), which means you can simply grab the edges of any frame and drag them to a new position. A nice feature is that once you've created a layout for (say) a left page, you can duplicate that page and automatically "mirror" (reverse) its layout to create the format for the facing page. There are also alignment tools to help you ensure that the margins of frames line up, which you may find more useful than the floating "guides" that Adobe uses in Creative Suite. Once you’ve finished eyeballing the position and size of a frame, you can then edit its properties to modify the size (by typing a new number for each dimension), the number of columns, the nature of the background and borders (if any), and alignment of the contents with respect to their frames, as well as the flow of text between frames and the rotation of the text. Rotation is useful for things like large tables that simply won’t fit legibly in a standard portrait orientation, and that must be rotated into landscape orientation.
Frames can be overlapped, allowing the use of features such as watermarks or even a layer of text callouts that describe the parts of a graphic that sits in its own layer. Callouts are a highly efficient way to explain the parts of a graphic, but the approach is often criticized by translators because it can be difficult to extract the text from a graphic for translation and then reinsert the translated text. Using an overlapping text frame above a graphic might be an interesting way to eliminate this problem and make it easier to localize graphics. To change the positioning of the overlapping frames, you can “float” them (bring them nearer to your eyes) or “sink” them (move them farther from your eyes). These options are similar to the “move forward” and “move back” (respectively) commands that appear in other software.
As in other authoring software, Blaze lets you define styles that are used to control the format of entire paragraphs (paragraph styles) or only subsets of a paragraph (character styles). Styles can be made hierarchical so that a "child" style inherits properties from a parent style. For example, if you define a master paragraph style as "p" (e.g., the <p> tag used in HTML files), you can now create a new style named "p.first" for the first paragraph after a heading; this new style will automatically acquire use all the formats defined for the "p" paragraph style, and you can now set the first-line indent to zero. To do this from within the stylesheet editor, simply right-click on an existing style, and from the popup menu, select "Add class". One small but annoying glitch is that when you’re editing a style in the stylesheet editor, Blaze doesn’t display the name of the style in the title bar of the dialog box. If you’re paying close attention, that won’t be a problem, but at the end of a long day, this omission makes it too easy to inadvertently double-click the wrong style, start editing, and wreck its properties before you notice what you've done.
Although you can define autonumbering as part of a style definition, there's no simple "pick a style that looks like this", as there is in Word. Instead, you select various properties for the number from a series of menus, and Blaze types a series of HTML-like tags for you to define the number. For example, you can select {B} and {/B} to define that you want the number to be boldfaced. How to define bullets in this dialog box isn't at all obvious; instead of selecting a specific option to insert a bullet, you must type the bullet character yourself in the format field at the top of the tab. The tradeoff for this unintuitive approach is that it offers much more control over bullets and numbering than in other software. One drawback is that because bullets and numbering are defined by the CSS standard (see below), you can't automatically define tabs as part of the format definition, so you'll have to type spaces instead.
Although you can apply manual formatting, as most of us do in a word processor when we press Control+B to boldface a word, the Blaze documentation quite properly notes that it's better to use a character style such as “strong”. The advantage of using a style is that if you decide that you want to switch from using the standard boldface format to an entirely different typeface (e.g., Cooper Black), you need only modify the style definition instead of having to hunt down every instance of boldface and manually change it to the new typeface.
In Blaze, styles are gathered together into “style sheets”. In addition to obvious style sheet alternatives such as one for print and one for online, you can develop less obvious style sheets, such as one that uses a family of serif fonts for body text in the North American printed version and a family of sans serif fonts for body text in the European version, or a style sheet for black and white output and another for color output. Blaze follows the cascading style sheet (.css) format used for Web pages, so if you’ve invested some time learning how to use CSS for Web design work, your knowledge will transfer well to Blaze. You can create as many of these style sheets as you want for any project. When it comes time to produce the final document, you can choose which style sheet Blaze should use to control formatting in the output document.
Blaze comes with two style sheet groups referred to as “mediums” (print and non-print, whose names clearly describe their functions). You can create your own custom style sheets, or simply edit the properties of these ones. Style sheets must then be associated with a specific “target”, which is the word MadCap uses to refer to specific output types. I'll discuss targets in more detail in the Publishing section of this review.
Individual styles can define all the standard things you’d expect to be able to control, such as typeface, type size, indentation, and so on. The typesetting engine isn't as sophisticated as the one offered by InDesign (what is?), but it's perfectly adequate for setting clear, readable type. There are some nice additional touches. For example, headings can be defined to span the entire page width, to only span a column, or to sit to the left of a frame that holds the majority of the body text. You can fake these things in most other software, with more or less effort, but Blaze automates this process and provides clear explanations in the documentation of how to achieve specific effects by pairing an illustration of each heading format with the steps required to produce it. A very nice touch indeed!
Autonumbering is available both for standard numbered lists and for specific things like chapter, figure (graphic), table, and page numbers. Control over these numbers is more extensive than in Word, and unlike its equivalent in Word, this feature appears to actually work. Similarly, you can choose from a range of bullet styles (or define your own) for bulleted lists. Both types of list let you define subordinate lists called "multi-level lists". For example, you could create a multiple-choice test with a series of numbered questions followed by groups of (a) through (e) answers. Moreover, Blaze makes it easy to insert unnumbered or unbulleted lines such as comments in the middle of a list without screwing up the list numbering or sequence.
Blaze is based on the XML format, which is a way of defining the elements of documents based on their function and relationships rather than on their visual characteristics. For example, the first information you'd see in a book would be the title; in an XML approach, this could be defined as "Title" (its function), whereas in more familiar tools such as Word, it would be defined based on the stylistic characteristics you assign to it (e.g., "Heading 1"). The two concepts are closely related, but there’s a key difference: In XML, you explicitly define information based on its role. Only afterwards do you decide how that role should be made apparent to the reader through the element's typographic characteristics. The advantage of this approach is that you can decide, for each type of output (e.g., print versus online), how to display the information without changing its function. As a result, something defined as a title will serve as a title no matter how you publish the project, but the printed title can have different typographic characteristics from the online Help title.
XML's function-based design also offers an advantage that style-based setups cannot offer: the ability to define schemas (content descriptions) using the document type definition (DTDs) approach. Blaze uses the XML concept of a schema to control both the required contents and the relationships between elements of the content. For example, if you're working in Word, you can create a template in which the document's title should be followed by the name of the author, but you can't force writers to include that author name and you can't prevent them from moving the author's name above the title. (Serious XML geeks will be pleased to know that the current version of Blaze provides basic support for the DITA architecture, and is working to improve this support. Although Blaze currently only supports its own internal XML schema, MadCap plans to support custom schemas in a future release.)
Although you can achieve a measure of control over information using templates or style collections in other software, doing so tends to be more kludgy and ad hoc. In addition, it's harder to repurpose information because the software isn't designed from the bottom up to support such reuse. With Blaze, reuse is at the heart of the software's design. Although this lets you accomplish things that would be difficult to accomplish with software such as InDesign, it also means that you must spend some time thinking about what you’re doing and developing an overall plan for your content before you begin instead of just making things up as you go. Although you don’t need to know any XML to start writing in Blaze, and you can create XML documents using their structural tags in exactly the same way you would assign paragraph styles in Word or InDesign, understanding a little XML will let you structure your documents more effectively, particularly when it comes time to define the relationships between structural elements. If you’ve ever examined or worked with the HTML tags used to create Web pages, XML will look very familiar to you. In fact, HTML is nothing more than a less rigorous (because the standard is so poorly enforced) and less flexible (because you can't create your own tag sets) version of XML. In both languages, information is coded very simply using tags: for example, <b>text</b> indicates that the text between the angle brackets should be boldfaced.
In the XML editor, Blaze displays the overall structure of the document at the left, as a series of nested bars. For example, a bar labeled “OL” indicates the presence of an ordered list (numbered or alphabetical); to the right of this bar, you’ll see bars labeled “LI” (list item) to show each numbered or lettered paragraph in the list. Across the top of the editor, you’ll see a tag area that lists the actual XML tags as your text cursor passes through a chunk of text. For example, if you position the cursor in a boldface word, you’ll see the tag <b> appear at the top. This is useful when you’re trying to figure out whether you’ve assigned the correct tag to a word, phrase, or paragraph.
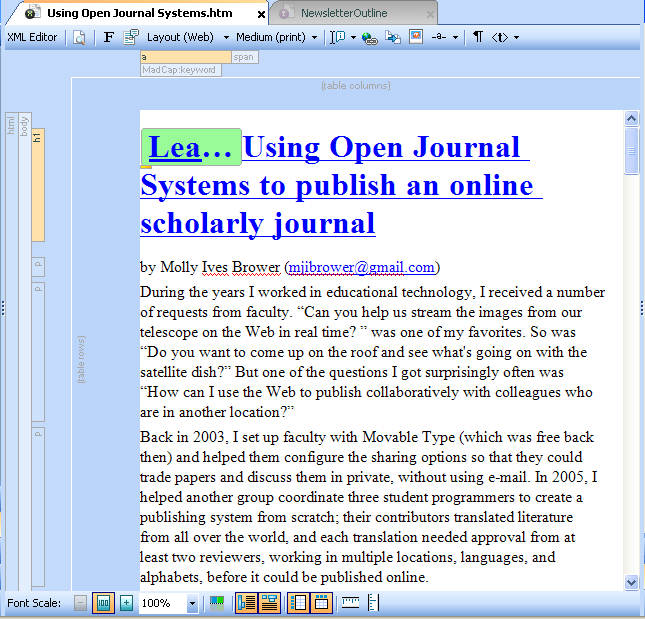
The XML editor works in WYSIWYG mode, and offers you two different view options: online and print. Both are useful for their named purpose, but the online view is more useful if space on your monitor is tight, since it doesn’t show the page margins and thus lets you fit more text on the screen than might otherwise be possible. The editor works well enough, but isn’t yet as sophisticated as the editing engine of a mature word processor such as Word. For example, there are fewer selection tools (I was not able to hold down the Shift key and scroll to select multiple paragraphs), and the Find and Replace dialog doesn’t automatically appear at its full size; to see all the search options, you must manually drag the borders to resize the dialog, and there’s no scroll bar to warn you that you’re not seeing the whole dialog. The search options are limited to “Match case” and “Use wildcards” or “Use regular expressions”, but there’s no handy popup menu (as there is in Word) to show you what the wildcard options are, and neither the PDF version of manual nor the online Help describe the options for either. When I pointed this out, MadCap promised to remedy this omission in a future release.
Blaze offers a table editor that will be basically familiar if you’ve ever created a table in other software. When you open the Table menu and choose to insert a table, Blaze lets you specify all the usual properties such as the number of columns and rows and the caption (title) of the table. Once you’ve inserted the table, you can then drag the column markers to change their width, can split cells, and can use the mouse to select adjacent cells and merge them. However, Blaze's table editor offers a few advantages you may not have seen before. For example, it automatically attaches the caption (title) to the table so the two can be moved around as a single unit, and it lets you apply an overall table style (e.g., a collection of formats for the title, the column headings, the rows, and the borders) that you can then reuse for subsequent tables.
Blaze also offers a “text box” feature similar to that provided by Word. One enormous advantage over Word’s text box feature is that the text box remains visible in all display modes, whereas in Word, it’s only visible in the Print/Layout mode. That defect in Word has caused me considerable grief over the years when I worked in the draft display (my preference) and missed text boxes that required editing.
Since many potential users of Blaze will have existing content that they want to bring into the software and subsequently revise there, I tested this by disassembling a newsletter I recently published into its component stories, then imported those files into Blaze. One “gotcha” is that the current version of Blaze would only import XML files, not the .doc files I created in Word 2007. (The documentation claims that Blaze will import both .doc and .rtf files, but this feature apparently changed before the software was released.) This meant that I had to convert the files into .docx format first. That’s no problem if you’re using Word 2007, for which .docx is the native format, but if you’re still back with an older version, you’ll either have to download Microsoft’s conversion utility or copy and paste the text into a new Blaze topic—an inconvenience, not a deal-breaker.
If you want to continue editing your files in Word after you've imported them into Blaze, the software offers an option that will automatically update its own versions of these files each time you reopen the project. If you're not satisfied with Blaze's XML editor as a writing tool, this would be a good alternative: create and revise the files in Word, but use Blaze to structure them, index them, and create the output formats. When you import the Word files, Blaze offers the option to split up large files into several topics based on the style information; for example, you could ask Blaze to automatically break one long file into separate topics at each occurrence of a style such as Heading 1. I didn't test this feature or how well the workflow based on writing in Word and updating the files in Blaze works, so if you decide to try either approach, test carefully to be sure everything works as advertised.
One interesting problem that arises during the import of Word files involves a longstanding bug in Word: the badly broken autonumbering feature. Many of us have learned not to rely on this feature, and to instead use SEQ (sequence) fields to create our numbered lists. (David Knopf provides an elegant explanation of how to do this.) If you use this approach, Blaze will convert the sequence codes into fixed numbers because of how Word stores the sequence information. Paradoxically, this means that if you'll be using Word as your authoring software to feed information into Blaze, you'll be better off using Word's own autonumbering. Blaze will generally be able to correct the autonumbering so that it works properly once the file is in Blaze.
To organize your information into the correct sequence, Blaze uses a structure called an "outline" that lets you create multiple “books” from the same project's contents, with each book containing its own list of topics. In the Outline Editor, you can also create new topics from scratch and start typing in those topics to create the relevant information directly in the XML Editor. Alternatively, you can simply drag and drop existing topics from the content manager into the desired position within an outline. Once a topic is available in the outline, you can move it around as desired to create the final structure of the book.
For small chunks of text that you will use repeatedly, such as a standard warning message or a link to a specific part of your company’s Web site, Blaze provides a feature called "snippets". These are akin to what other programs call “library items” or what Word calls “autotext”. In effect, you can define this information once, store it as a snippet, and wherever you need it, simply ask Blaze to insert the appropriate snippet. If you edit the original snippet, then all projects that contain the snippet will be automatically updated (next time you open them) to reflect the new contents of the snippet. This could be very useful, for example, when editing the copyright statement for a frequently updated document to include the new year: simply change the snippet from “Copyright 2008” to “Copyright 2008–2009”, and all topics that use that snippet will automatically receive the new, longer copyright date. Short snippets can be inserted in mid-sentence, and longer snippets can be inserted as their own sentence, paragraph, or group of paragraphs.
Snippets can be stored locally (within a single project) or globally (in a directory where anyone can use them for their own projects). Snippets must be edited in their original location, which is typically a folder included under the Resources section of a project. You cannot edit them directly from within a document where they appear—a design choice to discourage writers from creating several inconsistent and incompatible variants on the standard snippet. Fortunately, you don't have to hunt down a snippet at some obscure location on the company network if it needs revision; double-clicking the snippet will open it as a separate document in the XML Editor. There is no built-in "access control", so anyone can edit the snippets and in so doing, affect everyone else's work. The solution is to use your network software's permissions (or privileges) to allow everyone "read only" access to the snippets (so they can use them in their project), but only give certain users full read/write/modify access so that they can modify the snippets.
Blaze also offers the use of “variables”, which are similar to Word’s field codes. The software offers four types of variable:
A nice touch is that you can create sets of variables that can be used for specific projects, such as a newsletter set and a user manual set. This might be useful if, for example, you need to insert the names of certain columnists in each issue of a newsletter designed to introduce readers to various features of your product each month; you could store the author names in variables, and simply edit the variables when columnists change, but the variables would never be used in the user manual.
Graphics handling is simple and flexible. As in software such as Word or InDesign, you can insert an image directly into a topic file. The main difference is that such graphics will be automatically added to the project’s Resources, so that the same image will become available for use in any other topic. Alternatively, you can insert a graphic directly into a project’s Resources, and link to it from within one or more topics instead of embedding the graphic in that topic. This offers the advantage of easy updating. For example, if you change your company’s logo, or if part of the user interface that you're documenting changes, all you’ll need to do is replace the old graphic with the new one in the appropriate folder in the Resources, and all files that contain the graphic will be automatically updated to display the new version. If you own a copy of MadCap's Capture software, you can both grab screenshots of your product as you work and edit graphics that you've already added to a project's Resources.
Tables of contents (TOCs) include both mini-TOCs, which contain an overview of the contents (headings) of a single topic, and full TOCs, which cover the entire project. To insert a TOC, you must first create a topic to hold it, then insert something called a "proxy" inside the topic to tell Blaze that a TOC should appear at that location. Terminology differences notwithstanding, this is similar to the field that Word inserts when you ask the software to add a TOC. You can generate a TOC in the familiar way, simply by defining the specific heading levels (i.e., the XML tags for these headings) that should be included. You can also ask Blaze to create a TOC automatically based on the outline you’ve created. Blaze also lets you create TOCs that list all elements of a certain type, such as figures and tables, which is a helpful touch for many technical documents.
Blaze provides an indexing tool that will be familiar to anyone who’s used the built-in tools provided by other programs. Simply display the Index Entry window, position the cursor where you want the index keyword to lead the reader, and type the desired index term. Although Blaze offers an Index Explorer that displays all the keywords you’ve already used, this is only for reference purposes; there’s no way to automatically insert a word or phrase from that list into the current topic's index. This design makes the indexing tool slightly more useful than Word’s indexing tool (which does not display a list of index terms unless you repeatedly regenerate the index and display it as you work), but far less useful than InDesign’s indexing tool, which lets you pick from the list of keywords you’ve already used. MadCap's Analyzer software, available at an additional cost, will let you check for and fix inconsistent index entries, as well as serving a variety of other really useful validation functions, but from the indexer's standpoint, it's less useful than inserting the correct index entry in the first place. Another potential drawback is that instead of providing visual tools to create levels within the index, you create these levels manually by typing a colon between the words used for each index level. That's way too geeky for some writers, though some of us geeks may enjoy the degree of control this provides.
When you’re done adding the index keywords, you must then create a new topic that will hold the index, and as in the case of the TOC, you insert an index proxy to tell Blaze that you want an index to appear at that point. This is similar to the approach used in most other software, in which you create a separate document (in document-based software) or a separate story (in story-based software) to hold the index.
Blaze offers three familiar levels of cross-reference within the text:
You can also insert a context-sensitive cross-reference, in which the reference will include words such as “on the previous page” or “below” to describe the location of the referenced topic. Such links update automatically as the text changes. For example, if you use a context-sensitive cross-reference to refer to text on the previous page, and then insert several pages of text before the reference, the reference text will change from "see the previous page" to the actual page number. Cross-references will be updated automatically whenever you “build” the final output document, but you can also update them manually as you work so that you’ll see at all times where they currently point without having to build the project first.
Blaze offers a powerful review and revision model similar to that used by Adobe’s InDesign plus InCopy combination: the X-Edit family of products. The X-Edit Contribute software requires the purchase of a license, but offers various powerful features such as the ability to create new content using templates created by a project's design team; in a sense, that makes it similar to Adobe's Contribute software. X-Edit Review is free, and although it doesn't allow you to create new content, it lets you review the existing content created by Blaze authors using a strong suite of revision-tracking tools similar to those provided by Word. I didn't test these tools during the scope of this review, but the demonstrations I've seen of them in use seem very promising indeed.
Once you've written all the topics for a project, put them into order using the Outline Editor, and completed the review and revision cycle, you'll want to publish your project. Blaze currently offers five output formats that define the nature of the published output:
Blaze refers to the collection of characteristics that define the actual output documents, such as the PDF file and print version of a user manual, as “targets”, and you can define as many targets as you like for a given project, each with its own subset of the overall project contents and its own structure and style. Each such target is associated with one of the five output types. There does not currently appear to be any direct Web export, so you can't yet use Blaze to replace Dreamweaver or other Web-authoring tools, but you could conceivably use Blaze to create a series of targets that comprise individual XHTML files that comply with the XHMTL specification (one of the Web's native file formats). Then, you could stitch these files together into a Web site using a tool such as DreamWeaver.
Blaze also offers an extensive ability to customize your output by means of conditional tags. At its coarsest level, this feature lets you define the conditions under which individual topics within a project will be included in the final published output. For example, you might create a project that contains all the topics required for a training course, and plan to restrict some of the topics (e.g., the answers to class exercises or specific tips for classroom trainers) so that only the course's teachers will see those topics. By specifying that one target will be the student version and another target will be the teacher version, and by using conditional tags to define teacher-only topics, you can quickly generate the two versions of the course materials.
You can also use conditional text at finer levels. For example, if the color images you've created for the online version of the manual would unacceptably increase the cost of the printed version of the manual, you could use conditional tags to replace them with black and white equivalents. Conditional text offers an even finer level of control. For example, since hyperlinks clearly won’t be much use in a printed document, you can specify that they should only appear in PDF-based targets, and will be replaced by text-only cross-references in the printed document. Color images and hyperlinks would then appear in the online version, whereas black and white substitutes and "see..." references would appear in the print version. This is much easier than having to create and maintain two separate projects that are essentially identical except for such minor differences.
Blaze comes with two predefined conditional tags, PrintOnly and ScreenOnly, but you can easily define your own. Fortunately, condition tags are not complicated programming codes: they are a simple set of labels such as “beginner” and “expert” or "teacher" and "student" that define the uses for a chunk of information. When you eventually choose to publish a project, all you need to do is specify whether the target should or should not include text, graphics, or even whole topics that have been labeled with certain tags. By default, Blaze will include all tagged text in the output unless you tell it not to do so.
To publish your project (to create output), you start by creating one or more targets, defining an output type (e.g., PDF) for each target, and then (optionally) choosing any conditional tags that you want to use for that particular target. You can change output types for any target at any time, though if you’ve optimized the project or the target for a specific type of output, this modification will take some work. It's wiser to design a project and its target correctly right from the start.
Once you've completed this process, all you need to do is select the desired target and tell Blaze to use it to generate ("build") the specified output. You can set Blaze to publish it automatically to a specified network directory, so that (for example) the documentation files will be automatically included along with the software when a CD full of software is shipped off for duplication and distribution, or you can define a destination such as a Web site so that the files will be automatically uploaded to make the latest version available to readers each time you build the target. The original source files used to create that output remain safely in Blaze: the published output contains only what is necessary for the audience to use the file on their computer.
I could not find any information on the color model used by Blaze, but discussions with MadCap suggest that the underlying color model is RGB. This poses a challenge if you need to produce printed color on paper; because the software does not support the CMYK color model, you may have trouble obtaining the desired colors when you ship the files to a commercial printer for printing on a press. This isn't a problem for graphics, because you can create two parallel sets of graphics (one for onscreen use and one for printing) and define which set should be used in each target. It would be more of a problem if, for example, you needed to use a precise color, such as the color used in your corporation's logo, for headings in the text. To accomplish that, you'd need to talk to your printer or their prepress service bureau to learn whether they can solve this problem by editing the color definitions in the PDF files that you provide.
Blaze makes good use of embedded help (which MadCap refers to as “dynamic help”), both to provide orientation (what does this dialog do?) and to provide details once you select an option (what does this option do?). If this annoys you, you can turn off the large dynamic help window and use the traditional context-sensitive help file instead. I expect that many users will use the dynamic help while they’re getting up to speed on the software, then will switch to conventional help once they only need occasional assistance. MadCap also offers online discussion forums in which you can benefit from the expertise of your peers to solve problems. This will be particularly useful as an alternative to more general forums such as techwr-l while MadCap builds a core of experienced Blaze users.
The software ships with no printed documentation, but you can download a printable PDF of the “Getting Started” manual. Although I was able to learn the software fairly painlessly using nothing more than this file and the online help, I dislike the practice of selling complex software without decent printed documentation and asking the purchaser to print their own copy. Call me a dinosaur, but I like to have a book in hand that I can read on the bus, while eating breakfast, or in bed, without having to spend more hours at the computer screen than I already do.
That being said, the documentation is generally excellent: the writing is clear and comprehensive, and mostly makes it easy to find what you need to know. With the dynamic help, the software continuously displays information relevant to what you're doing, though a few times the help system didn't update to reflect the tools (e.g., the index entry window) that I was using. As in most documentation these days, the indexes in the PDF file and the online help are adequate, but not stellar, and in the online Help, I found occasional glitches; for example, the “Pictures, inserting” link took me to the topic for inserting special characters (e.g., the Euro symbol) rather than the topic for inserting a graphics file.
Although I was able to learn the software on my own sufficiently well to test out some of the key features simply by reading the "Getting Started" manual as I worked, and was able to successfully publish my first Blaze newsletter, this would have been far easier had MadCap shipped a simple tutorial with the software. I found no information on any tutorials in the documentation or MadCap's Web site, and therefore had to teach myself what I needed to know to complete my test project. Apart from the additional time this requires, another downside of this approach (based on my experience fixing Word and PageMaker documents created by those who hadn’t received any formal training) is that many things get done wrong or inefficiently; that was certainly my experience learning Blaze. An effective tutorial isn't hard: it would contain a batch of sample files and would walk new users through the process of assembling these files into a project and producing final output. I've used such tutorials to get up to speed with many other programs in a matter of hours, and I hope that MadCap will add such materials to their next product release.
For those who need a hand getting started, MadCap offers Web-based training and "MadCamps" at MadCap's own training facilities. No cost information is provided on MadCap's site, but the company informed me that prices start at around US$899 for a two-day Web-based training course, and are higher for a four-day on-site training program. However, MadCap is eager to support its customers, and suggested they'd be willing to offer significant price reductions for those who purchase a large number of licenses of MadCap software, as well as special deals for "unemployed technical writers". A useful “best practices guide” for moving from Frame to Blaze is also available if you're thinking of migrating.
If you're producing products with many international audiences, Blaze integrates with Lingo, MadCap’s software for managing projects in which the same information must be localized or internationalized into multiple languages. I did not test this feature.
Does Blaze live up to its promise? Like any version 1.x product, Blaze has a few rough edges, as I’ve noted in this review. In particular, the interface isn’t as intuitive or well-organized as in a more mature product like Word or InDesign; it’s not that the software interface is dysfunctional in any way, but rather that it's simply not as refined as older products. A particular problem is how overwhelming the workspace appears at first glance; the disadvantage of such powerful software is that its power makes it intimidating, and that makes it harder than necessary for newcomers to overcome their intimidation and start learning. Aspects such as the XML Editor lack the power and refinement of more advanced editing tools such as Word. The lack of a tutorial, the mediocre indexes in the documentation, and a few glitches in the Help file need some attention. There are also no scripting tools or macros, which means you’ll need a third-party tool such as MacroExpress to automate repetitive actions.
These caveats aside, if all the software's features work as well for long documents as they did in my test, Blaze will pose an increasingly credible challenge to both Word and Frame as its interface matures and as MadCap fills in some of the abovementioned gaps in the product's features. Whether you'll enjoy using the software is another matter entirely. Most of us develop strong preferences for how software should work, and the longer we spend mastering a tool such as Word or InDesign, the more resistant we become to changing our work habits to adapt to new software. I found Blaze large enough (and unfamiliar enough after several years away from the world of topic-based authoring tools) that I couldn't get comfortable with the software during my short experience. Had I taken formal training with the software, and spent more time using Blaze until I became comfortable with it, I suspect I'd have liked it better. For now, I can say that its breadth of features makes it a powerful and complex tool that will repay your investment of time learning its idiosyncrasies and becoming comfortable with it—but the longer you've been working with other software, the harder you'll need to work to overcome old habits and attitudes.
Should you switch to Blaze? To some extent, the answer will depend on what problems you're trying to solve: my usual take on software is that if your current solution works well, there's little or no reason to change. However, if Blaze does things you've been struggling to accomplish with your old software, you should download an evaluation copy and start playing with it. That's particularly true if you're just beginning to consider a transition from Word towards true long-document software, and particularly true if you are considering the possibility of single-sourcing and are willing to add Flare to your toolkit to produce the online Help.
Blaze retails for US$699, whereas Word 2007 retails for a bit over US$200, InDesign CD4 retails for about US$699, and Framemaker retails for US$899. The $200 difference represents a compelling price advantage over Frame, and MadCap offers a US$199 competitive upgrade from Frame that sweetens the deal further. If, like many companies, MadCap could be sweet-talked into offering a comparable upgrade price for Word and InDesign users, that would be a compelling reason to adopt Blaze even if you're on a tight budget. Though Blaze and InDesign have the same price, the cost equation appears much more favorable for Blaze if you compare the costs of using InCopy (at US$249 per seat) for review and revision with the costs of using X-Edit (at US$249 per site for the Contribute version, but at no cost whatsoever for X-Edit Reviewer).
If I were Adobe and Microsoft, I wouldn't be losing any sleep over Blaze. Each company has its cadre of devoted customers who won't be likely to change to something new. But I would be watching very carefully over my shoulder, since Blaze is a credible challenger and will become increasingly credible over time. As Adobe discovered with Flare, the price of hubris is often an uncomfortable brush with humility at the hands of a younger, nimbler competitor.
©2004–2024 Geoffrey Hart. All rights reserved.